
SLIDE 1
١
١
Computer Graphics using openGL
٢
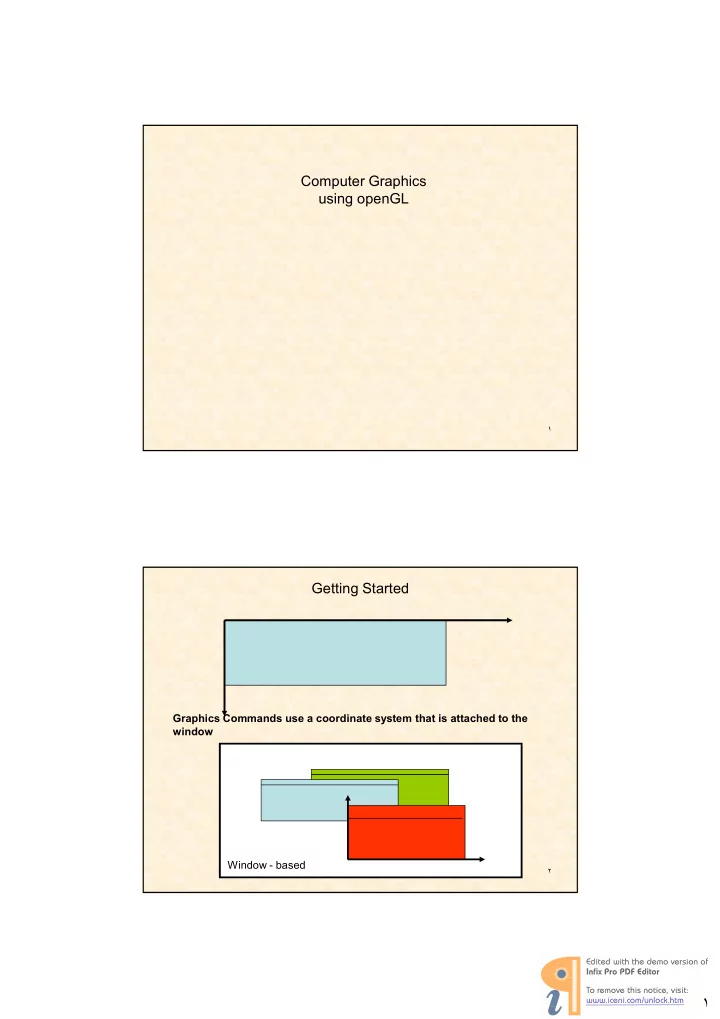
Getting Started
Window based
OpenGL is a software interface to graphics - - PDF document
١
٢
Window based
٣
٤
٥
٦
٧
&+,$- +. /+.01+ +
٨
In the "Project options" textbox replace 4& 4 with 4&4
The following files to the Object/library modules: opengl32.lib glut32.lib glu32.lib
9
10
11
12
13
14
15
16
$ .6376889: !"! # 6889 floats
15/03/2010 17
Why does this matter?
different sizes > the OpenGL types are consistent.
accuracy we should say:
Computer Graphics CSC476
23
25
,
and a $"
Usually, these characters cannot be placed arbitrarily on the display, but rather, can be put only in some row and column of a builtin grid.
text mode does, and characters can be placed arbitrarily. Figure 1.14 shows some examples of text drawn graphically.
A routine to draw a character string might look like /$7688$:< This routine places the starting point of the string at position (x, y) and draws the sequence of characters stored in the variable string.
6%( = 9( $( "
* -$ '"'>8 $8-$'"'>7:"
shape filled with some color or pattern.
Polygon A is filled with its edges visible, whereas B is filled with its border left undrawn. Polygons C and D are nonsimple. Polygon D even contains polygonal holes. Such shapes can still be filled. To draw a filled polygon, one would use a routine like , $7 8:< where the variable holds the data for the polygon the same kind of list as for a polyline and the variable contains some description of the pattern to be used for filling.
5 $ @ ( $ $ " $ ! @ 6 $ "
$ $8 $"
15/03/2010 31
Computer Graphics CSC476 15/03/2010 32
Computer Graphics CSC476
15/03/2010 33
15/03/2010 Computer Graphics CSC476 34
15/03/2010 35
15/03/2010 Computer Graphics CS510373 36
glClearColour( glClearColour(1 1, ,0 0, ,0 0, ,0 0); ); glClearColour( glClearColour(0 0, ,1 1, ,0 0, ,0 0); ); glClearColour( glClearColour(0 0, ,0 0, ,1 1, ,0 0); );
15/03/2010 Computer Graphics CS510373 37
colourExample.exe
38
39
٤٠
٤١
$ ," *$ ,768:< $ ,7'BB8 'CB:< ,&
٤٢
٤٣
56 &
٤٤
٤٥
$
,&
$ 7I4:< J K"L J KM"L J KM"L J KM$ "L *7$8HH$*: N $ 7O$8$*:<MM 9 ! MM $ 7E/A5PE?F:< MM9 $ /97>DB8D1B:< MM $ ,7'BB8'CB:< $ 744:< Q
46
47
J KM$ "L * 7:N $ 7E?EF--5?EF:< $ F$7E,)A:< $ .627(B"C8(B"C:< $ .627(B"C8B"C:< $ .627B"C8B"C:< $ .627B"C8(B"C:< $ 57:< $ - 7:< Q 7$8HH$*:N $ 74 4:< $ -7 :< $ 7:< Q
48
٤٩
1. Entire Screen is used (computer games, slide shows)
٥٠
2. Windowbased (upside down coordinates) (when multiple windows are useful, paint packages, word processing, graphing)
٥١
3. Windowbased (right side up coordinates) (an alternative more natural representation)
٥٢
void $ 2(GLdouble left, GLdouble right, GLdouble bottom, GLdouble top); Creates a matrix for projecting twodimensional coordinates onto the screen and multiplies the current projection matrix by it. The clipping region is a rectangle with the lowerleft corner at 7 8: and the upperright corner at 7$8:"
void $ 2( GLdouble left, GLdouble right, GLdouble bottom, GLdouble top)
٥٣
٥٥
٥٧
$ 7O$8$*:<MM 9 ! MM $ 7E/A5PE?F:< MM9 $ /97>DB8D1B:< MM $ ,7'BB8'CB:<
$ 744:< 7:< MM 9
$ -7 :< $ 7:<
*$ *$ 8 $6*" $ 8
٥٨
8% ! "
56 '& 3" * 7*:MMMM N $ 7E?EF--5?EF:< $ F$7E,A/:< $ .627'BB8CB:< $ .627'BB8'3B:< $ .627'CB8'3B:< $ 57:< $ - 7:< MM Q * *$ - $ -7*7H 7*7H :7*::< :7*::< ,&
" 6 $ - $ -7 :< :<
٥٩
60
61
"#$!%&'! ( #%0-#*#%-$:%$ -AA%-+ B !#*C-$:-+<% !#23-1D.*E)+<%%%%%% !#4#.56*>99:>99+<%%%% !#4#.5.2.#*9:9+<% !,-4#.5*@203@+<%%%%% !23-1!#$*0123-1+<%% #*+<% !D-#..3*+< F
$ " $ "
– RGB color – Single buffering – Properties logically ORed together
>3 >3
!"# # $%%& $%%&
.%#*+ B ,-,..%*99:%99:%99:%=9+< ,..*=9:%=9:%=9+<% D-D.%*G,+<%%%% .-#1%*+<%%%% .*H=9:%=9:%H=9:%=9:%H=9:%=9+<%% F
' ( (
65
%& %&
In the default orthographic view, points are projected forward along the % axis onto the plane %& 66
D-D.%*G,+
.-#1*+<%%%% .*H=9:%=9:%H=9:%=9:%H=9:%=9+<%%
67
68
٦٩
٧٠
٧١
The constant GL_POINTS is builtinto OpenGL. to draw other primitives, you replace GL_POINTS with GL_LINES, GL_POLYGON, etc. glColor3f() glVertex2i(…)
٧٢
. 7 6 8 : NMM $ 768 : $ F$7E,A/:< $ .62768 :< $ 57:< Q . 7 6 8 : MM$ $ NMM $ 768 : $ F$7E,A/:< $ .62768 :< $ 57:< Q
٧٣
٧٤
J K"L J KM"L J KM"L J KM$ "L ,N & 68< Q< 7: N 7:S< Q *7*: N $ 7'"B8'"B8'"B8B"B:<MM!$ $ 37B"B8B"B8B"B:<MM$ $ ,/971"B:< MM116 $ 67E,?R5A:< $ 7:< $ 27B8>DB8B8D1B:< Q
٧٥
*768: NMM$768: $ F$7E,A/:< $ .62768 :< $ 57:< Q */!7*:MM N ,T3UVNN'B8'BQ8N3BB83BQ8N2BB83BBQQ<MM 6 V 73:<MMB8 '82W ! $ 7E?EF--5?EF:< , VT6U<MM 7'B8'B:73BB83B:72BB83BB: 7"68":<MM 7VB< K'BBB<##:MM'BBB N 6V73:< "6V7"6#T6U"6:M2< "V7"#T6U":M2< 7"68":< Q $ - 7:< MM Q
٧٦
*7$8HH$*: N $ 7O$8 $*:<MM 9 ! MM $ 7E/A5P E?F:< $ /97>DB8D1B:<MM9 $ ,7'BB8'CB:< MM $ 7I$/!4:< MM$ ! $ -7/!:< 7:< MM 9 $ 7:< Q
٧٧
٧٨
٧٩
٨٠
٨١
٨٢
٨٣
.%-#*.-%A-:%.-%A/:%.-%A$:% #%0+ B 'A%-#%2!/2.#%!2#%%#!0/2%A' 3.#%9:%=:%< #%L< *0(9+ B .*LK9<%L&<%LMM+%9ILJK*-ILJM/ILJ+'< .*LK9<%L&<%LMM+%=ILJK*-ILJM$ILJ+'< .*LK9<%L&<%LMM+%ILJK*/ILJM$ILJ+'<
F 2*-#*-:/:$++< 'A%-5%-#%-%#%.%$!2.#%A' F
٨٤
.%23-1*+ B ,-*,))+< )#*+<
#*+< !2 *+< F .%01#*+ B D-D.*G,+< .-#1*+< ! .*H9:%9:%H9:%9+< D-D.*D4+< ,-,..%*=9:%=9:%=9:=9+ ,..*99:99:99+< F
٨٥
٨٦
15/03/2010 87
15/03/2010 88
−
%--%3.%2%#.%..% %5%$-#O%2% PP
15/03/2010 89
15/03/2010 90
15/03/2010 91
9 9 8 8
'
−
15/03/2010 92
15/03/2010 93
15/03/2010 94
15/03/2010 95
%3.% -2% /#%2$-% /!%.2%#.% 20%.%% #% % 5#.5PP
15/03/2010 96
* *%H 0#+%A%,4R'*0-H0#+:% *3.5*S=;:%H+A$.2*A=8A++A%,RR'*10-H 10#+%M%-/2*10#++<
fabs(x) : Calculates the absolute value of the floatingpoint argument.
15/03/2010 97
%K%,4R'*0-H0#+ )%K%H0#A ,%K%,RR'*10-H10#+ %K%E10#EA,
15/03/2010 98
٩٩
J K"L J K"L J KM"L J KM"L J KM$ "L V>DB< X$VD1B< 8F88< *7*: N $ 7'"B8'"B8'"B8B"B:<MM!$ $ 37B"B8B"B8B"B:<MM$ $ ,/97D"B:< MMDD6 $ 67E,?R5A:< $ 7:< $ 27B"B87 :8B"B87 :X$:< VMD"B< FVB"B< VVX$M2"B< Q
VMD"B<MM6BYD FVB"B<MMVB VVX$M2"B< MM
MM
١٠٠
VMD"B<MM6BYD FVB"B<MMVB VVX$M2"B<
MM
MM
١٠١
*7$8HH$*: N MM 9 ! $ 7O$8$*:< MM $ 7E/A5PE?F:< MM9 $ /97>DB8D1B:< MM $ ,7'BB8'CB:< MM $ 74 4:< MM$ ! $ -7 :< 7:< MM 9 $ 7:< Q
١٠٢
١٠٣
Making Line Drawings
*" *76'8'8 628 2: N $ F$7EA5/:< $ .6276'8 ':< $ .627628 2:< $ 57:< Q
/ "
١٠٤
MM $ .627:
١٠٥ ١٠٦
#include <windows.h> #include <math.h> #include <GL/GL.h> #include <GL/GLU.h> #include <GL/glut.h> const int screenWidth = 640; const int screenHeight = 480; GLdouble A,B,C,D; *7*: N MM!$ $ 7'"B8'"B8'"B8B"B:< MM$ $ 37B"B8B"B8B"B:< MM D6 $ 7D"B:< $ 67E,?R5A:< $ 7:< $ 27B"B87 :8B"B87 :X$:< Q
١٠٧
١٠٨
// open the screen window
١٠٩
, $@" 8W V768:8'V76'8':8"""8V768:" 8 4 4$ *88$F$7EA5E/?,:$ 57:"
$ F$7EA5E/?,:<MM $ .6272B8'B:< $ .627CB8'B:< $ .6272B81B:< $ .627CB81B:< $ 57:< $- 7:<
$8 EA5E/?,EA5E,
١١٠
"
$F$ 7E,)A:" 5G,52"3"'$ $
$ $ $ 8 $ -$ 2"'> $ @" $ 8 " W 8 F8 8 "
١١١ ١١٢
$ $ $" * 8 "
١١٣
١١٤
١١٥
١١٦
8 X 7:
9 "
١١٧
2"2> A "village"
houses drawn usingparameterizedHouse().
Figure 2.26, by making successive calls to parameterizedHouse () with different parameter values. (How is a house "flipped" upside down? Can all of the houses in the figure be drawn using the routine given?)
١١٨
*9X7,!88$: MM!<9$* MM$ N $ 7E?EF--5?EF:< $ F$7EA5E,:< $ .627!"68!":< MM $ .627!"6#M28!"( 3H$M1:< $ .627!"6#M28!"( $:< $ .627!"6( M28!"( $:< $ .627!"6( M28!"( 3H$M1:< $ 57:< $ F$7EA5E/?,:< MM $ 57:< $ F$7EA5E/?,:< MM $ 57:< $ F$7EA5E,:< MM $ 57:< $ - 7:< Q
! $" $88 6"
١١٩
J K"L J K"L J KM"L J KM"L J KM$ "L 7: N 7:S< Q ,N & 68< Q< V>DB< X$VD1B<
١٢٠
//<<<<<<<<<<<<<<<<<<<< myInit >>>>>>>>>>>>>>>>>> void myInit(void) { glClearColor(1.0,1.0,1.0,0.0); // set white background color glColor3f(0.0f, 0.0f, 0.0f); // set drawing color glLineWidth(1.0); // the line width is 4 pixels glMatrixMode(GL_PROJECTION); glLoadIdentity(); gluOrtho2D(0.0,(GLdouble) screenWidth,0.0, (GLdouble) screenHeight); }
١٢١
//<<<<< parameterizedHouse >>>>>>>>>>>>>> void parameterizedHouse(GLintPoint peak, GLint width, GLint height)
// the top of house is at the peak; the size of house is given // by the height and width
{ // the code written here } //<<<<<<<<<< myDisplay >>>>>>>> void myDisplay(void) { GLintPoint point; int width, height; // make successive calls to parameterizedHouse } //<<<<<<< main >>>>>>>>> void main (int argc, char ** argv) { // code written here }
١٢٢
5G,52"3"DF $
class GLintPointArray { const int MAX_NUM = 100; public: int num = 100; GLintPoint pt [MAX_NUM]; } pt is an array of GLintPoint num is the actual number of elements in the array
١٢٣
*, 7, 8 : N $F$7 EA5E,&EA5E/?,:< 7VB< K " num<##: $ .627 "TU"68 "TU":< $ 57:< $- 7:< Q
MMpt is an array of GLintPoint // num is the actual number of elements in the array
98EA5E,
١٢٤
١٢٥
,,< // global current position //«««««« moveto »»»»»»» **768: N ,"6V 6<,"V<MM,: Q //«««««« lineTo >»»»»»»»» * 768: N $ F$7EA5/:< // draw the line $ .627,"68 ,":< $ .62768 :< $ 57:< $- 7:< ,"6V 6<,"V < // update the CP Q
15/03/2010 126
15/03/2010 127
$*#%=:%#%1=:%#%:%#%1+<
* *= =:1 :1= =+ + * * :1 :1 + +
15/03/2010 128
$*#%=:%#%1=:%#%:%#%1+<
١٢٩
A special case of a polygon is the $$ 8 so called because its sides are aligned with the coordinate axes. You just need two points to draw it. // white background glClearColor(l.0,1.0,1.0,0.0); // clear window glClear(GL_COLOR_BUFFER_BIT); // // filled color is bright gray glColor3f(0.6,0.6,0.6); // draw the rectangle glRecti(20,20,100,70); // filled color is dark gray glColor3f(0.2,0.2,0.2); // draw the rectangle glRecti(70, 50, 150, 130) ; glFlush();
١٣٠
,7:4 4 $$ $
$ $ *- 78 88X$: MM$ X$$ N 7VB<K<##: N 6'V7:<MM 'V7X$:< 62V7:<MM !9 2V7X$:< *V7'B:M'B"BMM* 8$B' $ 37 *8 *8 *:<MM$ * $ $?76'8'86282:<MM$ Q $ - 7:< Q
١٣١
*F79: MM$ X$$ N *'V7'B:M'B"B< MM* 8$B' *2V7'B:M'B"B< MM* 8 $B' 7VB<K1<##: 7@VB<@K1<@##: N 6'VH9<MM ' 'V@H9< 62VH9#9<MM 2 2V@H9#9< 77#@:S2VVB:MM#@* $ 37 *'8 *'8 *':< $ 37 *28 *28 *2:< $ ?76'8'86282:<MM$ Q $ - 7:< Q
١٣٢
١٣٣
MMKKKKKKKKKKKKKKKLLLLLLLLLLLLLLLLLLLLLLLLLL *7,8: MM$ X$$ N 6BV"6<MM BV"< $ F$7EA5E,:< $ .6276B(8B:< $ .6276B8B(:< $ .6276B#8B:< $ .6276B8B#:< $ 57:< $ - 7:< Q MMKKKKKKKKKKKKKKK LLLLLLLLLLLLLLLLLLLLLLLLLL * 7*: MM N ,,< 9VDB< ,"6V M2< ,"VX$M2< $ 7E?EF--5?EF:< 7,89:< $ - 7:< MM
} ١٣٤
١٣٥
based on vertices use the usual list of vertices, but place them between a glBegin(GL_POLYGON) and a glEnd (): $ F$7E,)A:< glVertex2f(xo, yo); glVertex2f(x1, y1); . . glVertex2f(xn, yn); $ 57:< $ " 7/2"C:8
١٣٦
E?A5/E?A5E/?,E?A5E-A
triangle for each.
vo, v1, v2,, then v1, v2, v3, then v2, v3, v4., etc. (in an order such that all triangles are "traversed" in the same way, e.g., counterclockwise).
vertices: vo, v1, v2, then vo, v2, v3, then vo, v3, v4., etc.
١٣٧
quadrilateral for each.
foursomes of vertices: first vo, v1, v2,v3, then v2, v3 , v4, v5, then v4, v5, v6, v7, .,etc. (in an order such that all quadrilaterals are "traversed" in the same way, e.g., counterclockwise).
EZ/EZE/?,
15/03/2010 Computer Graphics CS510373 138
"#
15/03/2010 Computer Graphics CS510373 139
"#
!
%*N1%KK%TO%EE%N1%KK%TO+ B !!$#*+< F 2%*N1%KK%T5O%EE%N1%KK%T4O+ B !2 -34#.5*789:8;9+< F
15/03/2010 Computer Graphics CS510373 140
.%01U1/.-*!#2#%$ -%N1:%#%0.!2Q:%#%0.!2+
Runs whenever a keyboard event occurs (e.g. user presses a key)
.%01D.!2*#%/!.#:%#%2-:%#%:%#%1+
Runs whenever a mouse event occurs (e.g. user presses a mouse button, mouse moves)
.%0123-1*.+
Runs whenever the system determines that the window must be redrawn (e.g. window comes to the front, window has been moved)
.%012 -3*.+
Runs whenever a window changes size