T1 - Alcohol Lamp 2020/09/16 Inspect the lamp before each use to - - PowerPoint PPT Presentation

t1 alcohol lamp
SMART_READER_LITE
LIVE PREVIEW

T1 - Alcohol Lamp 2020/09/16 Inspect the lamp before each use to - - PowerPoint PPT Presentation

T1 - Alcohol Lamp 2020/09/16 Inspect the lamp before each use to make sure there are no cracks, chips or defects in the glass body. Adjust the wick height to about 3 mm from the top of the metal cap. Fill the lamp with denatured


slide-1
SLIDE 1

1

T1 - Alcohol Lamp

T1 Video on YouTube (Click) ▪ Use windshield to block wind and do not use books. Do not tilt lamp to avoid alcohol leakage while heating. ▪ Adjust device upon heating to an appropriate height. ▪ After use, cap should be put on to insulate air and extinguish the flame instead of blow it out. If lamp will not be used for a long time, alcohol inside should be returned to storage bottle. ▪ If lamp is overturned and cause small fire, cover the fire quickly with a wet rag and do not remove the rag immediately while extinguished, or flame may ignite again. Use fire extinguisher instead if a big fire happens. Inform teacher as soon as possible in such emergency and after fire is extinguished, immediately open doors, windows and exhausts to expel alcohol vapor in lab.

2020/09/16

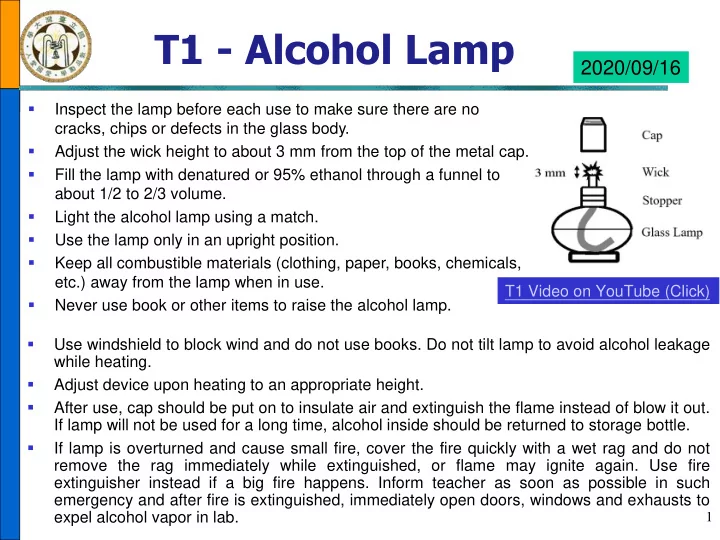
▪ Inspect the lamp before each use to make sure there are no cracks, chips or defects in the glass body. ▪ Adjust the wick height to about 3 mm from the top of the metal cap. ▪ Fill the lamp with denatured or 95% ethanol through a funnel to about 1/2 to 2/3 volume. ▪ Light the alcohol lamp using a match. ▪ Use the lamp only in an upright position. ▪ Keep all combustible materials (clothing, paper, books, chemicals, etc.) away from the lamp when in use. ▪ Never use book or other items to raise the alcohol lamp.

slide-2
SLIDE 2

Controls and Indicators of CORNING-420 Stirrer/Hot Plate:

◼ Power Indicator: Green light on when Stirrer/Hot plate is properly connected to

input power.

◼ Stir Control Knob: Turn it all the way counterclockwise to turn off stirring

  • function. Turn it clockwise to set desired stirring speed.

◼ Heat Control Knob: Turn it all the way counterclockwise to turn off heating

  • function. Turn it clockwise to set desired heating temp.

◼ Hot Top Indicator: Illuminates when the temp. of the top is too hot to touch

(greater than 60oC). When heating top is more than 550oC, Stirrer/Hot Plate will automatically power off and indicator starts to flash until the temperature is less than 60oC.

◼ White ceramic heating top with loading capacity 34 kg.

T2 - Stirrer/Hot Plate-I

2

T2 Video on YouTube (Click)

slide-3
SLIDE 3

3

⚫ Connect Stirrer/Hot Plate to a grounded power outlet with correct voltage. Never leave a gap between plug and outlet, replace damaged power cord immediately. ⚫ Keep power cord away from white heating top to avoid burns and damaged. ⚫ Always wear safety goggle and other protective equipment to avoid spillage while operating Stirrer/Hot Plate. ⚫ Place vessel in the center of white top with appropriate stirring speed. If stirring bar jumps irregularly, turn off Stirrer/Hot Plate to adjust vessel’s positon, then restart. ⚫ Clean white top before and after use or when liquid spills. Use non-corrosive cleaning agents and do not immerse Stirrer/Hot Plate in water for cleaning. ⚫ Replace Stirrer/Hot Plate once white heating top is broken or scratched. ⚫ Never heat large amount of volatile, flammable materials (such as ether, acetone, n-hexane, etc.) directly by a Stirrer/Hot Plate. ⚫ Insulating objects such as aluminum foil, thick-walled glassware cannot be heat by a Stirrer/Hot plate. ⚫ Take out stirring bar in solution by a Teflon-coated magnetic rod, do not grab it by hand to avoid corrosive chemicals and burns.

T2 - Stirrer/Hot Plate-II

slide-4
SLIDE 4

4

T3 - Mercury Barometer-I

T3 Video on YouTube (Click)

slide-5
SLIDE 5

5

T3 - Mercury Barometer-II

⚫ Step 1: Zero adjust Rotate the Zero Adjusting Knob to adjust the top of the mercury reservoir just touching the tip of the Zeroing Peg. ⚫ Step 2: Read the height of mercury column by the vernier ➢ Adjust the height of the Movable Scale so that the bottom of the slide piece is just even with the top of the meniscus. ➢ Read the main scale on the right of vernier. As in Fig. T3-1, the bottom of slide piece indicates the height of mercury is between 76.1 cm and 76.2 cm. ➢ Read the movable scale on the left of vernier where the lines match up with the main scale, i.e. 6 (the percentile

  • f

measurement). Therefore, the atmospheric pressure reads 76.16 cm-Hg. ⚫ For more precisely measurement, one should refer to manual of barometer to make correction of temperature.

slide-6
SLIDE 6

6

T4 - Collecting Gases over Water

Collection of gases over water is used to collect slightly water-soluble or water-insoluble gases from chemical reaction.

Water-insoluble gas is introduced into water of gas collection device and for its density of the gas is lower than that of the water, gas will rise to displace the water out. Oxygen (O2), nitrogen (N2) and hydrogen (H2) can be collected by this method.

For gases that are soluble in water, such as ammonia (NH3), hydrogen chloride (HCl) …etc., they are not suitable to be collected by this method.

Operation:

Invert the test tube that filled with water into the tub of water.

Place the rubber tube into the opening of test tube that displace the water out.

When the gas bubbles start to emerge from the opening of test tube, take rubber tube out of the test tube.

Stand the test tube upside down on table (opening pointed downward) or stop it with a rubber stopper. T4 Video on YouTube (Click)

slide-7
SLIDE 7

7

T5 - Decantation

▪ Decantation is a simple method to separate solids and liquid. ▪ When specific gravity of the solid precipitate is greater than liquid, it settles to the bottom. ▪ While there is little solid remain suspended, it may be separated easily from the liquid by carefully pouring off the liquid. ▪ Stand the suspended solution by allowing the solid to settle to the bottom of the mixture. ▪ Use a glass rod to guide the liquid flow when pour off the liquid from the beaker slowly enough that the solid is not carried along.

T5 Video on YouTube (Click)

slide-8
SLIDE 8

8

T6 - Gravity Filtration

▪ Fold the filter paper to cone shape. Tear

  • ff a small piece at corner to stick better

to the funnel. Properly position the paper in the funnel, and the filter paper should not over the edge of funnel. ▪ Use a ring clamp to support the glass

  • funnel. The tip of the funnel should

touch the side of the vessel which receives the filtrate. ▪ Use a glass rod to guide liquid, and pour the liquid onto the paper not on the glass. ▪ Pour the solution into the filter until the paper cone is no more than two-thirds

  • filled. Never fill the cone completely.

▪ After filtration, use tweezers to clip the filter paper; do not use your hand.

Iron stand The tip of the funnel touches the side of the receiving vessel Glass rod guiding decantation Funnel with filter paper Receiving vessel Pour the solution to the paper and no more than 2/3 volume of filter paper Ring clamp

Figure T6-2 Setup of gravity filtration Figure T6-1 Folding a filter cone

slide-9
SLIDE 9

T7 Video on YouTube (Click)

9

T7 - Vacuum Filtration

▪ Select a suitable unfolded piece of circular filter paper to cover the perforations

  • f Büchner funnel or Hirsch funnel.

▪ Moisten the paper with small amount of solvent, and tightly sealed against the bottom by turning on the water aspirator and closing the 2-way valve to apply suction. ▪ Test the suction works, then pour the solution down to a glass rod aimed at the center of the filter paper. ▪ After filtration, open 2-way valve first, then turn off the power of water aspirator to avoid the water backflow to the safety trap bottle from water tank. ▪ Turn off the circulating flow; drain the water in the water tank. ▪ Fill up the water tank of circulating water aspirator with water; keep circulating flow. ▪ Fix safety trap flask and suction flask with extension clamp. ▪ A Büchner or Hirsch funnel is sealed to the filter flask by the rubber.

slide-10
SLIDE 10

10

T8 - Centrifugation

▪ Check the casing inside the machine is intact and clean. ▪ Use centrifuge tubes in centrifugation; do not use ordinary test tubes. ▪ Use an equal number of tubes or fill one with a counterbalancing solution. Place centrifuge tubes on opposite sides to keep balancing. ▪ Always close the centrifuge cover before you start the motor, and open it only after the assembly has stopped. ▪ Start the centrifuge from low speed to check if there is any malfunction, then speed it up. ▪ If there are unusual sounds or vibration, turn off the centrifuge immediately in order to check and fix up. ▪ There must be at least one person look after the centrifuge when in use. ▪ When centrifugation is completed, turn off the switch and allow the rotating centrifuge assembly to come to rest. Do not attempt to stop the rotation manually when the centrifuge is still rotating at high speed. T8 Video on YouTube (Click)

slide-11
SLIDE 11

11 ◼

To maintain calibration, never move the balance.

Do not overload the balance. Maximum load of an electronic balance in lab is usually 610 g.

Check to see that the balance is level and clean before use.

Warm up the balance for 30 min before use.

T9 - Electronic Balance

Put weighed object in the center of weighing pan. Read digital readout for mass.

Use folded weighing paper, beaker or bottle as container while weighing. Do not put chemicals on the pan directly.

Always allow an object that has been heated to return to room temperature before weighing it.

Keep the balance and its case scrupulously clean. The balance area has a soft brush for this purpose.

Do not invert balance upside down to avoid damage to the parts inside.

Analytical balance is an instrument with high precision with maximum load of 210 g. Close its windshields while zeroing and weighing.

Analytical Balance (±0.0001 g)

T9 Video on YouTube (Click)

Electronic Balance (±0.01 g)

slide-12
SLIDE 12

T10 Video on YouTube (Click)

12

T10 - Weighing Chemicals

Read the label on bottle of the chemicals carefully to avoid taking the wrong one.

Use folded weighing paper, beaker, or weighing bottle to hold solid chemicals.

Use a clean and dry spatula to take solid chemical.

Use a clean and rinsed dropper to take liquid chemicals.

Keep the electronic balance clean and control the amount of chemicals taking to avoid excess weighing, dripping, and scattering around.

Unless specifically directed to the contrary, never return any excess reagent to the original bottle to avoid contamination. Put it in specified waste can.

Keep well closed after taking chemicals.

Keep the reagent shelf and the laboratory balance clean and neat at all times. Clean up any spillages immediately.

slide-13
SLIDE 13

13

T11 - Graduated Cylinder

▪ Use a dropper to add the liquid to the calibration line, or to draw out excess fluid. ▪ Slowly incline the cylinder to provide a steady stream of liquid from the spout to transfer the liquid to another container. Be careful not to splash. ▪ Continue inclining the cylinder until it is vertical and hold for about several seconds. ▪ Touch the drop at the tip of the spout to the wall of the receiving container. ▪ Wash and brush the graduated cylinder after use.

T11 Video on YouTube (Click)

▪ Clean the graduated cylinder and rinse twice with small amount of the liquid to be taken. ▪ Carefully place the liquid to be measured into the graduated cylinder with a steady stream against a wall near the calibration line, being careful not to splash. ▪ When the level is just below the calibration line, stop for a few minutes to let the liquid drain from the walls of the container.

slide-14
SLIDE 14

14

▪ Wash a 25 mL-transfer pipet thoroughly. ▪ Rinse twice with small portion of sample solution. ▪ Press valve A of pipet filler and squeeze bulb to expel the air inside and create a vacuum. ▪ Insert the top of pipet into pipet filler, press valve S to draw liquid to pass the graduation mark. ▪ Remove pipet filler and quickly close the top of pipet tube with forefinger and adjust liquid level to the mark. ▪ Hold pipet vertically and transfer liquid into

  • container. (One hand hold pipet and the other

hand hold container.) ▪ Remove forefinger and free fall the drop on tip by touching it to the wall of container. ▪ Stay for 5-15 s to drain the solution. ▪ Do not blow out remaining liquid. Pipet is calibrated for this to remain. ▪ Wash thoroughly after use.

T12 Video on Youtube (Click)

10 ml Ex

安全吸球 排氣閥 吸液閥 排液閥 移液吸管

25

ml

45o

25

ml

移液吸管

25

ml

A S E

Transfer pipet Pipet

Aspirate valve Bulb Suction valve Empty valve Pipette filler

T12 - Transfer Pipet

slide-15
SLIDE 15
  • Ex. Deliver 5.00 mL solution:

▪ Wash a 10 mL pipet thoroughly. ▪ Rinse twice with small portion of sample solution. ▪ Press valve A of pipet filler and squeeze bulb to expel the air inside and create a vacuum ▪ Insert the top of pipet into pipet filler, press valve S to draw liquid to pass the graduation mark. ▪ Remove pipet filler and quickly cover the top of pipet with index finger and adjust liquid level to the mark of 5.00 mL. ▪ Hold pipet vertically and transfer liquid into

  • container. (One hand hold pipet and the other

hand hold container to operate.) ▪ Remove index finger and free fall the drop on tip by touching it to the wall of the flask. ▪ Stay for 5-15 s to drain the solution. ▪ Do not blow out remaining liquid, pipet is calibrated for this to remain. ▪ Wash thoroughly after use.

15

10 ml Ex

25

ml

安全吸球 排氣閥 吸液閥

A S E

排液閥

安全吸球

5 6 7 8 9 10

Aspirate valve Bulb Suction valve Empty valve Pipette filler

T12 - Graduated Pipet

Transfer pipet Pipet

slide-16
SLIDE 16

17

T13 - Volumetric Flask

▪ Wash volumetric flask thoroughly and rinse with DI water. ▪ Transfer the solution to flask with the help of a funnel. ▪ Fill the flask about half full and swirl the contents to achieve solution. ▪ Bring the liquid level almost to the mark. ▪ Use a dropper to add solvent to the mark. ▪ Stopper the flask and invert the flask repeatedly to assure homogeneous. ▪ Pour the solution in a beaker for later use; do not store the solution in the flask. ▪ Wash immediately after use.

標線刻度 100

ml ±0.15 In 20oC

Mark

T13 Video on Youtube (Click)

slide-17
SLIDE 17

18

T14 - Titration

▪ Rinse a buret with DI water thoroughly. ▪ Rinse twice with ca. 5 mL titrant. ▪ Transfer the titrant to buret via funnel. ▪ Drain slowly until the tip is free of air bubbles and completely filled with liquid. ▪ Read and record initial (Vi) and final volume (Vf) of buret to 0.01 mL. ▪ Place buret tip well inside the receiving flask during titration. ▪ Swirl the flask with right hand and control the stopcock with left hand (process done by one person). ▪ Rinse the buret with tap water, inverted clamped, and left to dry after the experiment.

T14 Video on Youtube (Click)

slide-18
SLIDE 18

19

T15 - Litmus Paper

▪ Blue litmus paper will turn red under acidic condition. ▪ Red litmus paper will turn blue under basic condition. ▪ With the color change of the litmus paper, the acidity and alkalinity of sample can be known but the precise pH value cannot be determined. ▪ There is another widely used universal indicator paper which is a combination

  • f a variety of indicators to obtain various color changes. Compare the colors

with pH paper indicator chart, the pH value of sample can be known roughly. ▪ When test with solution, use a clean glass rod dip the solution and then touch it

  • n a litmus paper or a universal indicator paper. Do not throw litmus paper

directly into solution to avoid contamination. ▪ When test with gas, first wet the litmus paper and then place it on the opening

  • f vessel. After the gas diffuse out and absorbed by litmus paper, the acidity

and alkalinity can be judged by color change. T15 Video on YouTube (Click)

slide-19
SLIDE 19

20

T16 - pH Meter-I

◼ Presh the “POWER” button, warm up for 10

minutes

◼ Remove the electrode cap by rotating it ◼ Use wash bottle to rinse the electrodes ◼ Blot dry with a tissue ◼ Press “HOLD” when cleaning the electrodes

and the display will freeze

◼ Collect pH 7.00 and 4.00 standard buffer

solution

◼ Switch Mode to “Temp” function to check if

the temp is close to r.t.

◼ Switch to “pH” function ◼ Immerse thermoprobe and electrodes into

pH 7.00 buffer solution

◼ Rotate Calib knob until meter displays ‘7.00’ ◼ Rinse thermoprobe and electrodes ◼ Immerse in pH 4.00 buffer solution ◼ Rotate Slope knob until meter shows ‘4.00’

Electrode NT$ 4000 !! Slope Calib Hold Buffers Mode Power Preparation and Calibration:

slide-20
SLIDE 20

21

◼ Use beaker for testing ◼ Place the electrode on the holder ◼ When testing, both thermoprobe and

the electrode should be placed in soln

◼ The salt bridge of electrode should be

fully immersed in the test solution

◼ Position the electrode properly so that the

stirring bar will not strike the electrode

◼ Turn the magnetic stir on ◼ Rinse the electrode with DI water and

blot dry with tissues when changing the test soln

◼ Immerse the electrode in clean DI water

when not in use

◼ Immerse the electrode in 3 M KCl soln

when not in use for long period of time

Salt bridge

T16 - pH Meter-II

Measurement:

slide-21
SLIDE 21

(1) Turn on power to warm up for 20 min (2) Empty the cuvette holder (3) Press Mode button and set to A (Absorbance) (4) Set the analytical wavelength (i.e. 620 nm) (5) Press “BLANK” button to zero set (6) Place blank soln to cuvette holder (7) Press “BLANK” to calibrate (8) Place sample soln into cuvette holder (9) Align cuvette in same direction to control the path of the light (10) Close lid and read the Absorbance

29

T17-Spectrophotometer

SP-830 plus Note: YouTube T17 Video shows old Spectronic 20, new SP-830 plus is using in lab now

Calibration and Measurement:

slide-22
SLIDE 22

33

T18 - Dispenser

  • 1. Check the pre-set volume and

do not change the volume setting afterwards.

  • 2. Position the flask under the tip
  • f dispenser.
  • 3. Lightly pull the piston pump up

and down several times to get rid of the bubbles.

  • 4. Lightly pull piston pump up to

the top, then slowly push down to obtain the measured solution.

(2) (1) (3) (4)