INDO ENGLISH SCHOOL WORD PROCESSOR: TABULAR PRESENTATION CLASS-6 - - PDF document

indo english school
SMART_READER_LITE
LIVE PREVIEW

INDO ENGLISH SCHOOL WORD PROCESSOR: TABULAR PRESENTATION CLASS-6 - - PDF document

INDO ENGLISH SCHOOL WORD PROCESSOR: TABULAR PRESENTATION CLASS-6 COMPUTER CHAPTER NO -3 QUESTIONS GIVEN AT THE END OF THE CHAPTER AND THEIR ANSWERS Prepared By: Ms. SUBHASHREE ROUT OBJECTIVE: I. State whether the following statements are


slide-1
SLIDE 1

INDO ENGLISH SCHOOL

WORD PROCESSOR: TABULAR PRESENTATION

CLASS-6 COMPUTER CHAPTER NO -3

QUESTIONS GIVEN AT THE END OF THE CHAPTER AND THEIR ANSWERS

Prepared By: Ms. SUBHASHREE ROUT

OBJECTIVE:

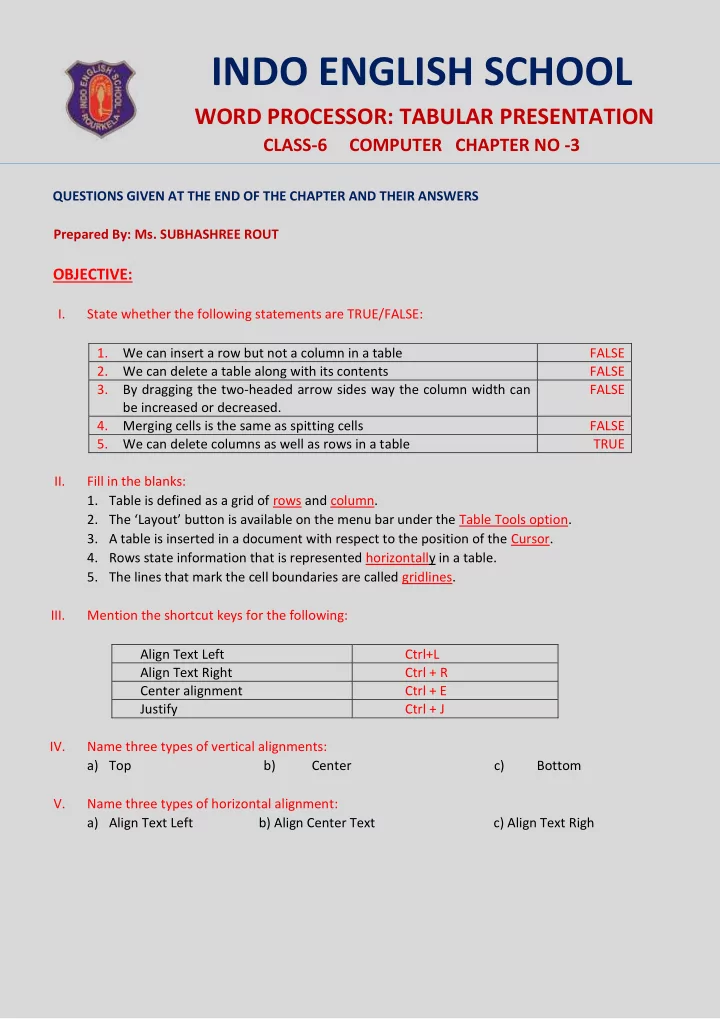
I. State whether the following statements are TRUE/FALSE:

  • 1. We can insert a row but not a column in a table

FALSE

  • 2. We can delete a table along with its contents

FALSE

  • 3. By dragging the two-headed arrow sides way the column width can

be increased or decreased. FALSE

  • 4. Merging cells is the same as spitting cells

FALSE

  • 5. We can delete columns as well as rows in a table

TRUE II. Fill in the blanks:

  • 1. Table is defined as a grid of rows and column.
  • 2. The ‘Layout’ button is available on the menu bar under the Table Tools option.
  • 3. A table is inserted in a document with respect to the position of the Cursor.
  • 4. Rows state information that is represented horizontally in a table.
  • 5. The lines that mark the cell boundaries are called gridlines.

III. Mention the shortcut keys for the following: Align Text Left Ctrl+L Align Text Right Ctrl + R Center alignment Ctrl + E Justify Ctrl + J IV. Name three types of vertical alignments: a) Top b) Center c) Bottom V. Name three types of horizontal alignment: a) Align Text Left b) Align Center Text c) Align Text Righ

slide-2
SLIDE 2

SUBJECTIVE: I. Write short notes on the following:

  • 1. Cell: A cell is a grid of rows and column that intersect to form cells. The lines that mark the cell

boundaries are called gridlines.

  • 2. Resizing a table: Resizing a table means decreasing or increasing the table size as per our needs.

We may change the table size proportionately, length-wise or width-wise depending upon the data items

  • 3. Merging and splitting of cells: Merging cells means to combine cells by converting one or more

cells into a single cell. Other hand, splitting cells is the reverse of merging cells where a particular cell is divided into a number of small cells.

  • 4. Cell Alignment: MS WORD aligns text in a table to the top left corner of a cell. Alignment defines

the position of data/text placed within the boundary of a cell. The computer system primarily provides two different types of alignment of data/text within a cell i. e vertical alignment and horizontal alignment. II. Write all the steps to perform the following tasks:

  • 1. Creating a table:

Step 1: Place the cursor on the document where you want to create a table. Step 2: Click the ‘Insert’ button which is available on the menu bar. Step 3: Select ‘Table’ and then ‘Insert Table’ from the drop-down list. Step 4: Enter the number of columns and rows in the ‘Insert Table’ window. Step 5: Finally, click OK.

  • 2. Deleting a column in a table :

Step 1: Select the row that is to be deleted. Step 2: Click the ‘Layout’ button under the ‘Table Tools’ option which is available on the menu bar. Step 3: Select ‘Delete’ and then an appropriate option, i. e., ‘Delete Column’ from the drop down list.

slide-3
SLIDE 3
  • 3. Inserting a row in a table:

Step 1: Set the cursor in any cell in the row above or below which we want to insert a row. Step 2: Click the ‘Layout’ button under the ‘Table Tools’ option which is available on the menu bar. Step 3: Click an appropriate option, i. e., ‘Insert Below’ or ‘Insert Above’.

  • 4. Merging cells in a table:

Step 1: Click the ‘Insert’ button which is available on the menu bar. Step 2: Select ‘Table’. Step 3: Select ‘Insert Table’ from the drop-down list. Step 4: Enter the number of columns and rows in the ‘Insert Table’ window. Click ‘OK’. Step 5: Enter the data /text in the table where merging isn’t required. Step 6: Now, select the cells which are to be merged. Step 7: Click on the ‘Layout’ button under the ‘Table Tools’ option which is present on the Ribbon area. Step 8: Select the option ‘Merge Cells’.

  • 5. Changing the row height in a table :

Step 1: Select a cell or cells of the desired table. Step 2: Click the ‘Layout’ button from ‘Table Tools’ option. It will display the default table row height in the ‘Cell Size’ area. Step 3: Click this button ( ) to change the height of the row to a specific measurement of the selected cells.

  • 6. Adding Borders to a Table:

Step 1: Select the cell or cells of the desired table where a border is to be added. Step 2: Click the ‘Design’ button from ‘Table Tools’ option followed by the ‘Border’ button. Step 3: Click on the drop-down arrow button ( ) to select the desired border type.