SLIDE 1
Using Google Slides
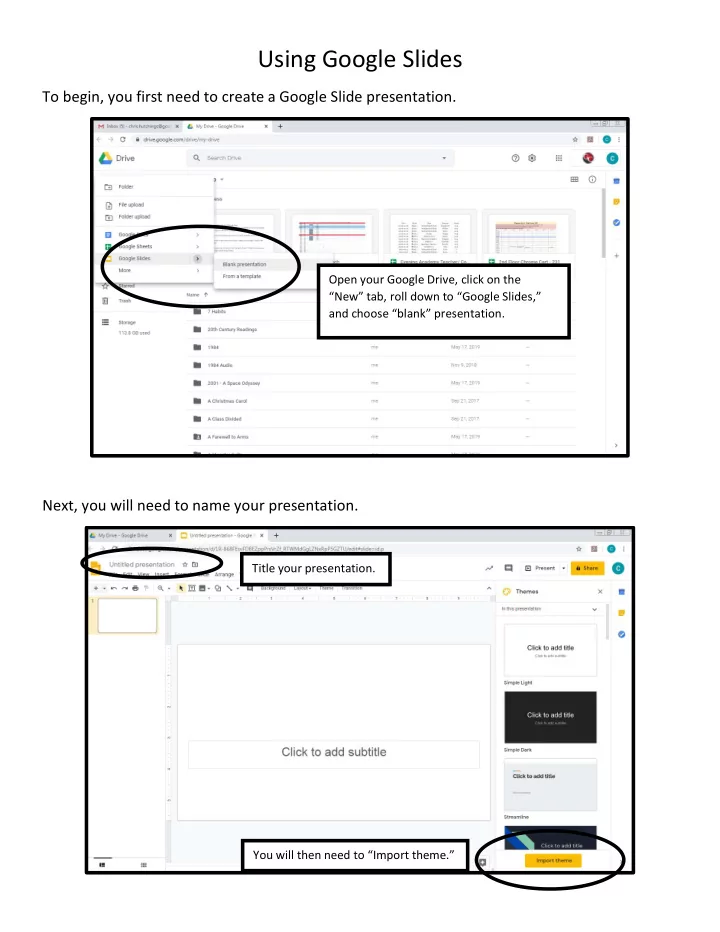
To begin, you first need to create a Google Slide presentation. Next, you will need to name your presentation.
Open your Google Drive, click on the “New” tab, roll down to “Google Slides,” and choose “blank” presentation. Title your presentation. You will then need to “Import theme.”
SLIDE 2
You now need to save the theme to your slides. I have named my slides “Digital Story.”
You can then choose from the themes on the right side of the screen for your background. Once you have chosen a theme, you can manipulate that in different ways. You can change the color of the background by clicking “Background,” and then choosing a color. You can also change the layout by clicking on “Layout.”
SLIDE 3
These are the basics for building a Google Slide. If you need more help, or if you would like to take it a step further, you can click on the “Help” tab. Then click “Training.” This will give you many different supports.
SLIDE 4
Creating Your Digital Video Using Google Slides
Google has recently added the capability to add audio to its presentations. The following will guide you through the process to add audio to your presentation. I would recommend you time your digital story before creating the slide presentation. After you set your transitions, I would then recommend recording your audio while watching your presentation transition to ensure the transitions fit the events in your story.
First, you need to open a new presentation in Google Slides.
SLIDE 5 Next, choose your presentation theme. To add slides, hit the “+” symbol on the left
- side. If you click on the down arrow, you
can choose what type of slide you would like to use.
SLIDE 6
Now you are ready to add the audio file. Click the “Insert” tab. Then choose “Audio” from the drop down menu. Find the audio you would like to use from your computer or from Google Drive. I would recommend saving your audio in Google Drive so you do not have to wait for the file to be downloaded.
SLIDE 7 Your audio file should show up on your presentation slide. Next, you need to format the audio in your presentation to play continuously throughout your presentation. Right click
- n the audio icon in the presentation. Then
click “format options.”
SLIDE 8
Within “format options,” click on the “Audio Playback tab. Click on the “Automatically” tab under “start playing.” Next, click on the “Hide icon when presenting” and click off the “Stop on slide change” tabs.
SLIDE 9
If you only have 12 images, you will need to set the transitions to 5 seconds. If you have more pictures, you may need to set the transitions to every 2 or 3 seconds. If you have a longer audio, you will need to increase the transition time.
Now it is time to practice. Click on the “View” tab, and then click “Present.” On the presentation, a bar will appear on the bottom. Click on the “Setting” symbol, then click on “Auto-advance (when played) and determine the speed of transition. You will need at least 12 images in your art gallery. This is the “Setting” symbol.
SLIDE 10
To Create Transitions… You will need to copy each slide for the number of seconds the slide will show. For example, if the slide is presented for 5 seconds, then you will need to copy it 5 times. To copy a slide, right click on the slide you want copied, and choose “Duplicate Slide.”
SLIDE 11 This will duplicate the slide. Repeat this for the number of seconds the slide is to be presented. Be Aware! If you duplicate your first slide with the audio, the audio will also be
need to delete the audio on the first copy before making more copies.